There are desserts that intimidate by name alone. Apple Tarte Tatin is one of them: caramel, the flip, apples that “turn to mush.” Here’s the good news: if you work step by step, it turns out reliably – even on the first try. We’ll cook a dry caramel, choose the right apples, pack them tightly, cover with homemade shortcrust pastry, and, after baking, make a confident flip. The result: amber shine, a golden, crisp yet tender crust, and a clean, even slice that holds its shape.
Video recipe on YouTube. In this video I make Tarte Tatin step by step: dry caramel without a thermometer, homemade shortcrust pastry, tight apple packing, the flip, and serving. If you prefer to watch, open the video and cook with me in real time.
The Story of Tarte Tatin: A Happy Accident Turned Classic
Legend says Tarte Tatin was “born from a mistake.” At the Tatin sisters’ provincial hotel in Sologne (France), apples accidentally caramelized in a pan longer than needed. To save the dish, a sheet of pastry was placed on top, it was baked, then flipped – resulting in a caramel apple “upside-down pie.” Guests loved it, and the dessert quickly entered Parisian restaurant menus.
But the idea of “upside-down” tarts predates this (as early as the 19th century), and in Sologne there was a similar tarte solognote. So the “accidental” legend is a charming story that coexists with facts about earlier inverted tarts and the later “branding” of the name.
How to Choose Apples for Tarte Tatin
Variety. You need firm, aromatic apples that hold their shape: Granny Smith, Reinette, Jonagold, Pinova, Braeburn. They don’t fall apart during baking and give a neat, even slice. Soft, mealy varieties (like some “winter” backyard apples) turn to purée in caramel.
Size. Choose medium apples of similar size. They’re easier to arrange and give the tart a pleasing look.
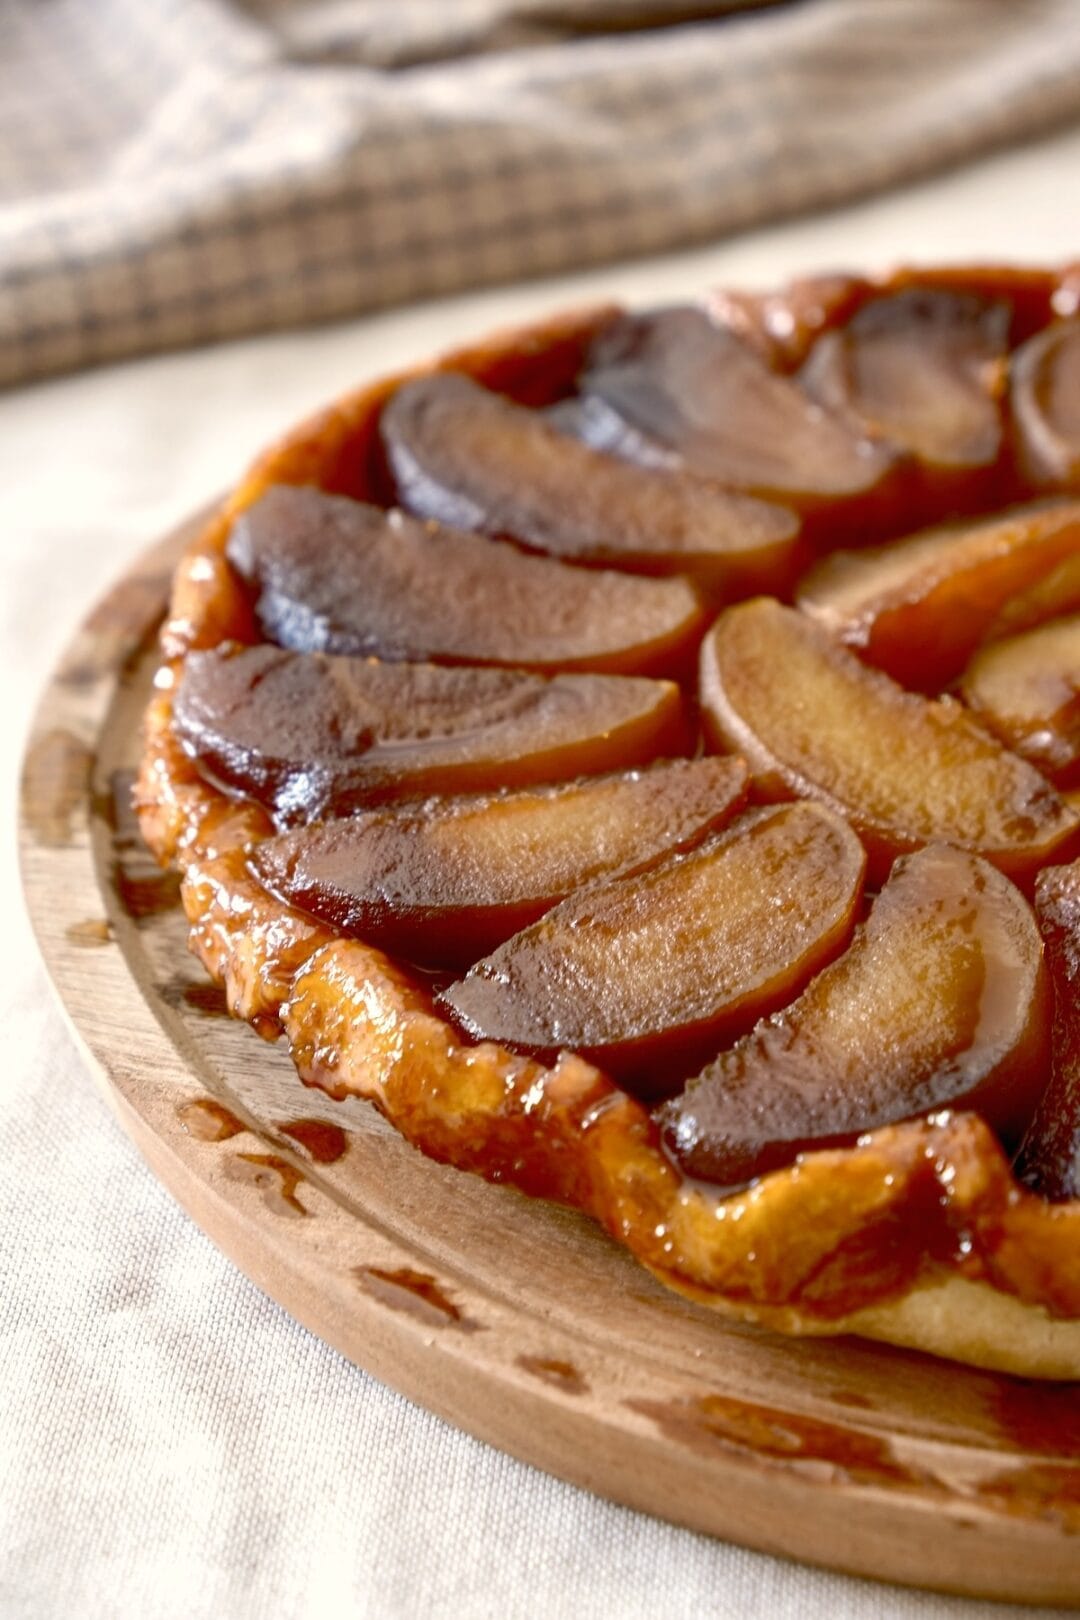
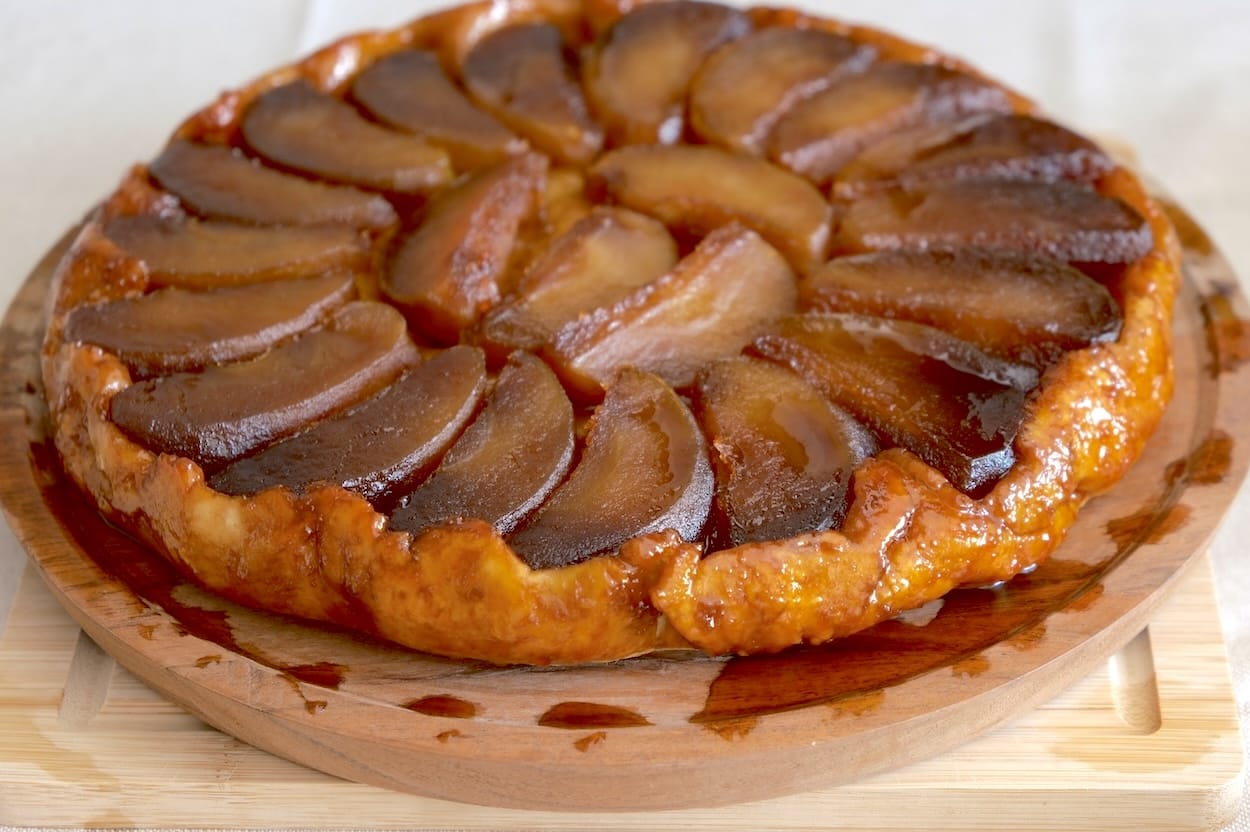
Cut. Slice each apple into eighths and place them cut-side vertical, side faces down. The wedges interlock into a tight structure, stay in place during the flip, and create a clean pattern on top.
Butter: What to Choose and Why It’s Critical
In a Tatin, butter is flavor (milky notes, creaminess); it’s sauce texture (gloss, viscosity); and it affects pastry behavior (short, tender crumb). So it must be good butter.
Choose unsalted butter with at least 82% fat. The more fragrant it is, the “wider” your caramel flavor. For the pastry, keep the butter cold: the fat rubs evenly into the flour, giving a delicate, shattering shortcrust after baking.
Butter: What to Choose and Why It’s Critical
In a Tatin, butter is flavor (milky notes, creaminess); it’s sauce texture (gloss, viscosity); and it affects pastry behavior (short, tender crumb). So it must be good butter.
Choose butter with at least 82% fat. The more fragrant it is, the “wider” your caramel flavor. For the pastry, keep the butter cold: the fat rubs evenly into the flour, giving a delicate, shattering shortcrust after baking.
One Pan… or Two
Traditionally, this recipe is made start-to-finish in one oven-safe skillet: make the caramel, add apples and pastry, then bake. If you don’t have a skillet that can go in the oven – perfect, neither do I, and I still want Tatin. No problem: make the caramel in a separate pan, then pour it into the baking tin, assemble, and bake there.
BUT don’t use a springform pan – the caramel will leak out.
By the way, if you love caramel, check out my separate article on Homemade salted caramel.
Hands-On Guide (ingredients & exact steps are in the recipe card)
What you’ll use, at a glance
Firm apples, plain sugar, good butter, and a round of shortcrust. An oven-safe pan is nice; a regular skillet plus a tart tin works just as well. Gloves are non-negotiable for the flip.
The rhythm of the recipe
1) Chill first, roll later.
Shortcrust likes the cold. Keep the butter cold and the dough relaxed. Roll it between parchment into a circle just larger than your tin, then park it in the fridge while you work on the apples and caramel. Cold pastry = crisp edges and clean slices.
2) Apples prepped for structure.
Peel, core, and cut each apple into eighths of similar thickness. A quick spritz of lemon keeps them bright while you prep. Think “Tetris,” not “tossed” – identical wedges stack tighter and look neater after the flip.
3) Dry caramel, zero fuss.
Scatter a thin, even layer of sugar over a dry pan and bring to medium heat. Don’t stir; swirl. Watch the color – not the clock: clear → straw → amber. The moment it turns amber, pull from the heat and whisk in butter and a pinch of salt for a glossy, pourable sauce.
4) Assemble for success.
Coat the base of your tin with the hot caramel (tilt to cover). Nestle the apple wedges side-faces down as snugly as possible – outer ring first, then the center. Tight packing matters: apples shrink in the oven, and gaps will show.
5) Blanket with pastry.
Lay the chilled disc over the apples, tuck the edges inside the tin like a quilt, and vent the top with a few fork pricks so steam can escape instead of ballooning the crust.
6) Bake, rest, flip.
Bake until the pastry is confidently golden and you see caramel bubbling around the edge. Let the tart stand about 5 minutes – bubbles subside, caramel loosens, apples settle – then invert in one bold move onto a warm plate or board. Lift the tin to reveal that amber sheen.

FAQs & Fixes
Caramel crystallized. Likely stirred too early or moisture hit the sugar. Use the dry method, don’t stir—only swirl.
Caramel is bitter. Over-colored. Next time, stop at amber and add butter immediately to quench the heat.
Apples slid during the flip. Fruit was mealy/mismatched sizes or packing too loose. Cut into eighths, pack tightly, rest 5 min before flipping.
Soggy pastry. Apples were too juicy. If you see lots of moisture on slices, pat the wedges dry with paper towels before arranging.
Caramel/apples stuck to the tin. Put the tart back into the tin and warm it briefly on very low heat or in the oven (bottom heat), then flip again.
Storage & Reheating
– At room temperature: up to 12 hours, covered.
– In the fridge: 2–3 days. Recrisp in the oven 10 min at 160–170°C / 320–340°F (the shortcrust crisps back up).
– Freezing: not recommended – caramel attracts moisture; apple and pastry texture suffer.
Variations & Ideas
– Pear + apple (50/50): softer texture, delicate aroma. Choose firm, less-juicy pears.
– Spices: cinnamon, vanilla bean, a pinch of cardamom – use lightly so you don’t drown the caramel.
– Salted caramel: instead of a pinch, add 3-4 g salt to the hot caramel at the end for a more “grown-up” flavor.
– Nuts: a few toasted pecan or walnut halves add flavor and texture contrast – and look great.
Classic Apple Tarte Tatin (Step-by-Step, No Thermometer)
Print RecipeIngredients
- Filling & Caramel
- 3-4 firm apples, medium size
- 150 g sugar
- 60 g butter
- A pinch of salt
- Pastry
- 250 g flour
- 125 g cold butter
- 20 g sugar
- A pinch of salt
- 1 egg yolk
- ~35–45 ml ice-cold water
- (or use a ready-made round shortcrust disc to fit your tin)
Instructions
Homemade Shortcrust. Pulse flour with cold butter to fine crumbs.
Add sugar, a pinch of salt (skip salt if your butter is salted), yolk, ice water; pulse to combine. If needed, add more water 1 Tbsp at a time.
Wrap and chill 30–60 min.
Roll between two sheets of parchment into a circle to fit a 24–26 cm tin. Chill again until assembly.
Prep the Apples. Peel, core, and cut each apple into 8 wedges of similar thickness.
Dry Caramel - Step by Step. Sprinkle a thin, even layer of sugar over a clean, dry skillet. Medium heat. Do not stir with a spoon. Gently swirl or rotate the pan so melted sugar “catches” new crystals.
Watch the color: clear → straw → amber. Amber is your mark; a few seconds later it turns dark brown and bitter.
Remove from heat. Stir in butter pieces + a pinch of salt (skip if butter is salted), return to heat, and cook, stirring, to a smooth sauce.
Immediately pour the hot caramel into the baking tin, tilting to coat the base evenly. Safety: Caramel is extremely hot (170–190°C / 338–374°F). Wear gloves, don’t lean over the steam, and don’t touch the caramel - burns are instant.
Assembly. Apples: arrange wedges side faces down in the hot caramel, tightly, with no gaps. Make an outer ring first, then fill the center. Tight packing matters: apples release juice and shrink; loose packing looks messy after baking.
Pastry: Take the chilled disc, peel off one parchment sheet, lay pastry over the tin, remove the second sheet, and tuck the edges inside - like a blanket for the apples. Pierce a few vents with a fork/knife so steam can escape and the pastry doesn’t balloon.
Bake at 190°C / 375°F for 30-40 min, until the pastry is confidently golden and caramel bubbles around the edges.
Remove and let rest 5 minutes (set a timer!). Bubbles will subside and the caramel will slightly set-making the flip clean and easy, with the apples releasing from the tin.
Cover with a large plate/board, grip firmly with gloved hands, and make one quick, confident flip. Lift the tin away.
Serving Tarte Tatin. Best served warm: the caramel is pliable, the apples shine, the pastry is crisp. Classic pairing: a scoop of vanilla ice cream or spoonful of crème anglaise - the hot-cold contrast amplifies flavor. For balance, sprinkle a few flakes of sea salt to lift the caramel notes.
If you try this recipe, share your impressions or fun tweaks in the comments below. Your feedback helps me create even more delicious recipes!


Be the first to comment